From Excel, the Manage Scheduling dialog lists all the schedules that you have access to, together with when they were last run.
When you select a folder or schedule, these toolbar items are available:
| Icon | Description |
 | Adds a new schedule in the currently selected folder |
 | Configure Distribution Lists |
 | Configure External Groups |
 | Refresh the list of schedulesGroups |
Management
When you create a schedule, you can set properties:
- Name: A name used to identify the schedule in the management screen. Not shown to the recipients.
- Description: A longer description, only visible on the Edit Schedule screen.
- Enabled: Whether the schedule will be sent or not.
- Repeat: How often the schedule should be sent.
- Start date: When the schedule should be sent for the first time.
- Allow recipients to run on-demand: Adds the schedule to the recipients' Anaplan XL Web interface, where they can download the attachments as and when they need to. To work with this feature, recipients should be specified through distribution lists.
Reports to send
Each scheduled email can contain one or more reports, previously published to Anaplan XL Reporting Web. For each report, you can:
- Choose a set of web settings to fill in. You can choose whether to send the report as an attachment, send the file to a file share, or include a link.
- Customize the filename.
- Choose whether you want any generated files to be PDFs, Excel files, PowerPoint files (if the report was published with PowerPoint configured), or embedded as an image (if the report was published with 'Allow image to be embedded in scheduled email' configured).
- Select the worksheets to include in the report.
- Select the Multisheet options (if the report was published with Multisheet configured).
Additionally, the Merge files of the same type into one file option can be used to merge every report that shares a file type into one file. For example, all the PDF attachments will be compressed into one PDF file, and all the Excel files into another. The order in the files will be based on the order in the dialog. The file names will be based on the first attachment of each type.
Placeholders
By entering these custom values as report parameters, you can customize the file for each user.
| Code | Description |
| %date% | Inserts the current date |
| %time% | Inserts the current time |
| %datetime% | Inserts the current date and time |
| %rolename% | Inserts the database role or roles that are being used |
| %groupname% | Inserts the name of the distribution group |
| %distributionlist% | Inserts the name of the distribution list |
| %email% | Inserts the email address of the recipient. Ignored if %emailtosendto% is also used |
| %displayname% | Inserts the display name of the recipient. Ignored if %emailtosendto% is also used |
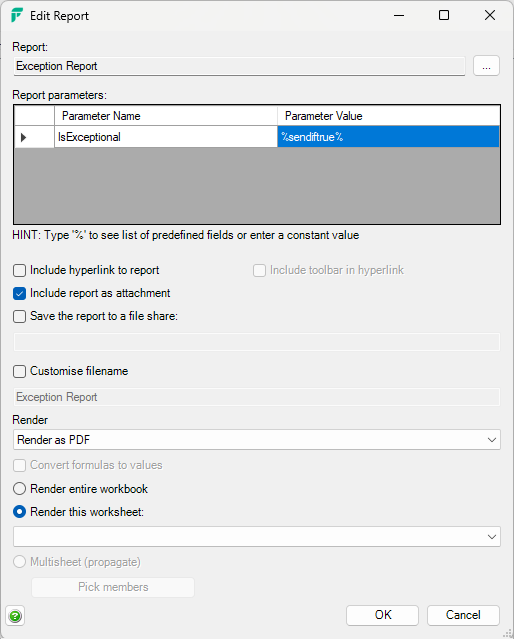
| %sendiftrue% | Triggers sending of the report. May only be used once per report |
| %emailtosendto% | Retrieves a comma-delimited list of email addresses from the report. May only be used once per schedule |
%sendiftrue%
If %sendiftrue% is used the report will be generated normally, but only sent to users if this parameter is calculated to be TRUE.
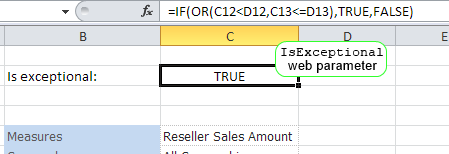
This allows exception reporting, for example, if you had appropriate names defined in Excel, you could set the formula in the parameter cell to be
=Or(Sales < 1000, Losses > 50)
The report can be published with the exception-detecting cell exposed as a Web Parameter:
This parameter can then be used as the %sendiftrue% parameter when setting up the schedule:
%emailtosendto%
If %emailtosendto% is used, the email addresses defined in the schedule or distribution group will be ignored, and the addresses retrieved from this parameter instead. The value in the cell may be either one email address or a comma-delimited list.
Note that this parameter overrides the %email% and %displayname% parameters.
Allow recipients to run on-demand
Enable this option to allow recipients of the schedule to download the schedule results from Anaplan XL Web > Preferences > Schedules.
Send the schedule as a text file
To send the report as CSV or tab-separated values files, first configure the ranges to render in Workbook Options.
You can then select the option to include these ranges when you schedule the report.
Who to send to
The recipients of the schedule can be specified in two ways: use pre-configured Distribution Lists, or using a list of email addresses (separated by semicolons, commas or new lines). Failure report recipients (that is those who'll receive a message if the schedule fails) can also be specified here.
Subscriptions
If desired, the schedule can also use a subscription-based model. It can work in one of two ways:
- Recipients need to subscribe: People can see the available schedules in the Anaplan XL Web interface and subscribe to it, if desired.
- Recipients can unsubscribe: Anyone you specify here can remove themselves from the subscription, but new people can't add themselves.
Email message
Here you can control the email's subject line and message body. In each part, you can use the Placeholders described above, plus any defined in the SQL Administration app (Admin > Categories and in your Active Directory).
Formatting email
With Send email as HTML selected, you can use HTML formatting in the email message body.
Embedding images
You can also use %image1% to control how any images you add to the Reports to Send section are added.

