Formatting themes in Anaplan XL Reporting help you keep reports professional, consistent, and aligned with your company's branding. They control how tables in Anaplan XL look — fonts, colors, borders, and more — help teams produce reports with a unified style.
Consistent report formatting strengthens your organization's visual identity and improves readability. By using formatting themes, administrators and users apply the same branded styles across reports without manually recreating designs. This section explains how to create, customize, and share formatting themes.
Prerequisites
Before you start, make sure you have:
- Anaplan XL Reporting installed and licensed.
- Excel skills — formatting cells, copying tabs, and navigating workbooks.
- Experience with Anaplan XL — using the Anaplan XL ribbon, formatting grids, and refreshing reports.
- Administrator rights, IT-managed option only — needed to update the
FormatSheet.xlsxfile in Program Files.
Note: While creating and applying formatting themes in Anaplan XL Reporting doesn't require coding, it does require familiarity with Excel formatting tools, the Anaplan XL ribbon, and, in some cases, coordination with IT to update installation files.
Create and share themes using two methods:
- User-based distribution — Quick and simple, good for small teams.
- IT-managed distribution — Centralized, scalable, and ideal for large organizations.
Understand formatting themes
Creating formatting themes in Anaplan XL ensures that all your reports share a consistent professional look. They control how grids appear in Anaplan XL and can include:
- Fonts and colors
- Borders and number formats
- Header, row, and column styles
- Formatting for specific members, hierarchy levels, or slicers
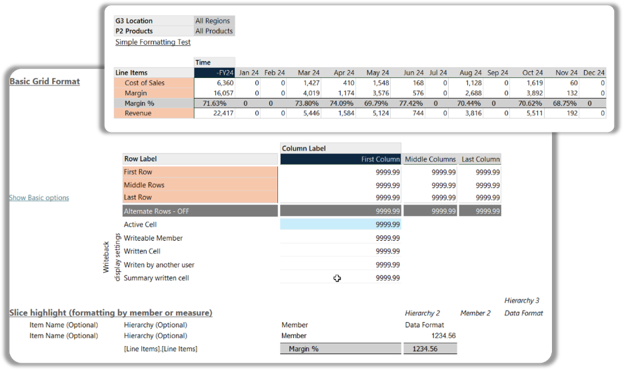
When you apply your first grid to a new workbook, Anaplan XL automatically creates an XLCubedFormats tab. The FormatSheet.xlsx file in your Anaplan XL Reporting installation stores formats and applies them to the XLCubedFormats tab.
Example of a grid formatted by using the XLCubedFormats tab:
You can customize the formatting themes in two ways:
- In the workbook – Edit the XLCubedFormats tab. Changes affect all the grids added within that workbook. It doesn't apply to new workbooks. Below is an example of a grid formatted using the XLCubedFormats tab. View Format grids in Anaplan XL Reporting for more information.
- In the installation files – Edit the FormatSheet.xlsx file. Changes become the default applied to the XLCubedFormat tab for any new workbook or selectable formats in the Workbook Format dropdown menu in the Anaplan XL ribbon.
User-based distribution
As an administrator, you create a formatted XLCubedFormats tab and share it with others. Users manually replace the tab in their workbooks or use the file as a template.
To create and share themes:
- Create the format — Apply your styles to a grid in Anaplan XL by configuring the XLCubedFormats tab.
- Save and share — Send the file or the XLCubedFormats tab to others.
- User options:
- User opens their Anaplan XL workbook.
Replace the tab: Delete the existing XLCubedFormats tab, copy the shared tab, ensure the tab is named exactly XLCubedFormats, and refresh the grid. - Use as a template: Start new reports with the shared file so formatting applies automatically.
- User opens their Anaplan XL workbook.
Pros and cons of creating formatting themes using user-based distribution.
| Pros | Cons |
| No IT involvement needed | Manual process for each user |
| Quick setup for small teams | Only applies to one workbook at a time |
| Great for one-off or report-specific formatting | No enforced version control or standardization |
| Multiple templates possible for different report types | Not scalable for large organizations |
IT - Managed distribution
You update the FormatSheet.xlsx file in the Anaplan XL Reporting installation folder with up to 10 custom styles. These styles then appear in the Workbook Format dropdown for all users.
To create and share themes:
- Locate the file — usually in:
C:\Program Files (x86)\Anaplan\Anaplan XL Reporting\FormatSheet.xlsx
Save a local copy to edit; the original is read-only. - Define styles:
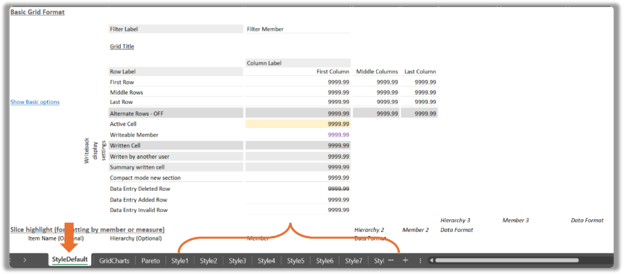
- StyleDefault — Default format for new grids, reflected in the XLCubedFormats tab.
- Style1-Style9 — Additional selectable formats in the Workflow Format dropdown in the Anaplan XL ribbon.
- Save and replace:
- After updating the styles, save your changes.
- Keep the file name the same as FormatSheet.xlsx and replace the original in the same directory. Administration rights may be required.
- Distribute via IT:
- Push the updated
FormatSheet.xlsxfile to all existing installs. - Include the file in the install package for new users.
- Optional: Create a version control and update policy.
- Push the updated
Pros and cons of distributing formatting themes using IT-managed distribution:
| Pros | Cons |
| Automatic for all users | Requires IT support |
| Ensures consistent formatting | Changes need re-deployment |
| Easy to access from the Anaplan XL ribbon | |
| Scalable for large organizations |
Note: Formatting themes only work for Anaplan XL Grid reports and not for charts, dashboards, or freeform reports. Updates don't apply automatically — you must redistribute changes.
User-based distribution is ideal for piloting formats or supporting smaller teams who need flexibility.
Once you agree on the style, IT-managed distribution lets you roll out more with IT help. This makes sure everything looks the same across your company.
Or choose a hybrid approach. Use an IT-managed distribution to add a core set of standard formats for common reports. Use user-based to distribute file-based templates for reports that require specialized formats.

