A picklist is a dropdown list that provides users with a list of valid values to select from. Filtered picklists contain more complexity and reference other lists in a model: the driver and filter lists. Selections made in a driver list determine what users can select in a filter list.
Create your driver, filter, and valid combinations lists in General Lists in the model settings bar. See examples in Create many-to-many filtered picklists.
If you want to create many-to-many filtered picklists, you can use the Assign action with a valid combinations list to map the relationship between list items in the driver and filter lists.
The Assign action enables you to easily assign a list item to a parent. The action requires a numbered list with at least one list-formatted property, and a parent hierarchy. For many-to-many filtered picklists, the driver list must be a parent of the valid combinations list.
Configure the valid combinations list
- Select General Lists in the model settings bar, select your valid combinations list, then select Open.
- Select Configure.
- Select the driver list in Parent Hierarchy. For example, Role.
- Select the Numbered List? checkbox.
- Select Apply.
Create a list property in the valid combinations list
- Select Properties > Insert, then create a filter list property. For example, Compensation Plan (filter).
- Select OK.
- Select the filter list property, then select the ellipsis (...) in the Format column.
- Select List in the Type dropdown, then select the filter list in the List dropdown. For example, Compensation Plan.
- Select OK.
Create a module and dashboard for the Assign action
- Select Modules in the model settings bar, then select Insert Module.
- Add the valid combinations list on columns, insert line items on rows, and remove Time. Your line items might be Role Compensation 1, Role Compensation 2, etc.
- Select View > Publish to Dashboard > New Dashboard, then type a name for the dashboard. For example, Valid Combinations of Role to Compensation Plan.
- Select Save.
- Select Save & Exit in the dashboard toolbar. If the dashboard toolbar is hidden, right-click on the dashboard tab to show the toolbar.
Create an Assign action
- Select Actions in the model settings bar, then select New Action > Assign.
- Type a name for the Button text. For example, Assign.
- In Using list-formatted property, select the filter list property in the valid combinations list.
- Select OK.
- Select the action, then select View > Publish to Dashboard. Publish to the same dashboard that you created earlier. For example, Valid Combinations of Role to Compensation Plan.
- Select Save & Exit in the dashboard toolbar.
Assign driver list items to filter list items
- In your dashboard, select a list item from the driver list (Role), then select the Assign action.
- Select the right arrow to move list items from the filter list in the left-hand unassigned field to the right-hand assigned field. For example, if you select Executive in the Role list, you can assign Plan A and Plan B to that role.
- Select OK.
When you assign driver list items to filter list items, they populate the valid combinations list in Grid View. As the valid combinations list is a numbered list, each list item in the filter list contains a unique identifier.
| Parent | Code | Compensation Plan (Filter) | |
| #1 | Executive | Plan A | |
| #2 | Executive | Plan B | |
| Executive | |||
| #3 | Senior Manager | Plan C | |
| Senior Manager | |||
| #4 | Manager | Plan D | |
| Manager |
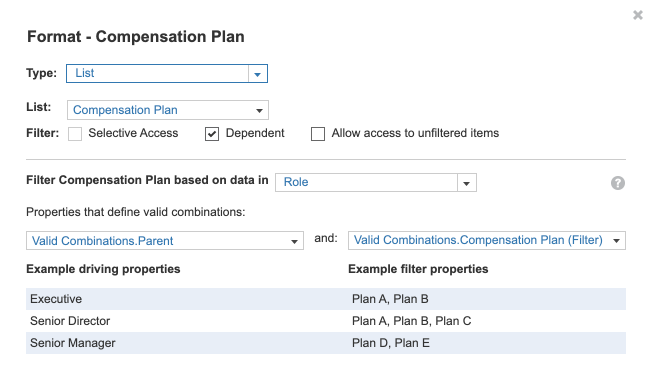
When you have set up the relationships between driver and filter list items in the valid combinations list, follow the steps in Create many-to-many filtered picklists to create a module for the filtered picklist.
When you format the filter line item in your module, the Parent Hierarchy in the valid combinations list is the parent that drives the combinations. In this example, the parent is the driver (Role) list.