Outlier grouping page allows you to display a subset of the selected members grouped together into a common set, often called Others.
You can select the criteria to define the group and give it a name. Additionally, you have the option to choose a member to be always shown, regardless of whether it would appear on the list.
Ranking example
Normally we return the top 10 members, but we may also want a summary of the items not displayed. For example, here's a list of products:
| Product Category | Sales Amount |
| Bike Racks | $434,593.09 |
| Bottles and Cages | $16,439.27 |
| Cleaners | $24,654.55 |
| Helmets | $674,633.76 |
| Hydration Packs | $148,582.67 |
| Locks | $48,675.66 |
| Pumps | $40,544.06 |
| Tires and Tubes | $2,182.05 |
| Mountain Bikes | $26,492,684.38 |
| Road Bikes | $29,358,206.96 |
| Touring Bikes | $10,451,490.22 |
| Bib-Shorts | $370,465.14 |
| Caps | $55,690.32 |
| Gloves | $385,367.30 |
| Jerseys | $856,307.39 |
| Shorts | $440,725.85 |
| Socks | $37,785.58 |
If you use a normal ranking, the top 10 is displayed, but you lose the other products which may be significant:
| Product Category | Sales Amount |
| Bike Racks | $434,593.09 |
| Bottles and Cages | $16,439.27 |
| Cleaners | $24,654.55 |
| Helmets | $674,633.76 |
| Hydration Packs | $148,582.67 |
| Locks | $48,675.66 |
| Pumps | $40,544.06 |
| Tires and Tubes | $2,182.05 |
| Mountain Bikes | $26,492,684.38 |
| Road Bikes | $29,358,206.96 |
Instead, from the Advanced tab, select Outlier Grouping > Rank and group outliers.
In the dialog box, select these options:
- Grouping name: Others
- Group if outside of criteria
- Ranking: Top (10)
- Current measure
- Hierarchy: Date Calendar (Default Member)
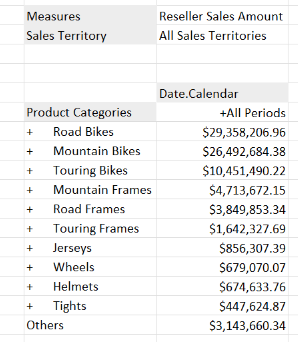
The option Always show member forces a specified member to always be shown. For example Top 10, plus a specified member (if it isn't already included in the top 10), plus others. In this case, always show member wasn't specified, and the selection results in the below grid:
Keep these members separate was selected. You can change this to Group these members, which groups the top 10, and has all other members shown as normal.
User driven grouping
- Select certain members and enable the user to select which ones will be included in the Others group using a slicer.
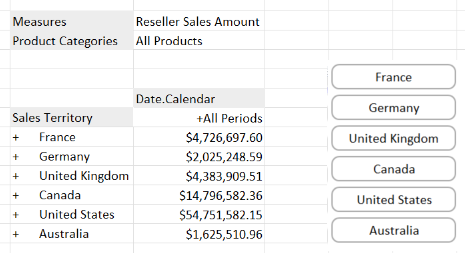
- Start with a simple grid listing the Sales Territories. Users will be able to select territories and have those go into the Others group. The rest will be displayed as normal.
This is the initial setup with the slicer not being linked to anything.
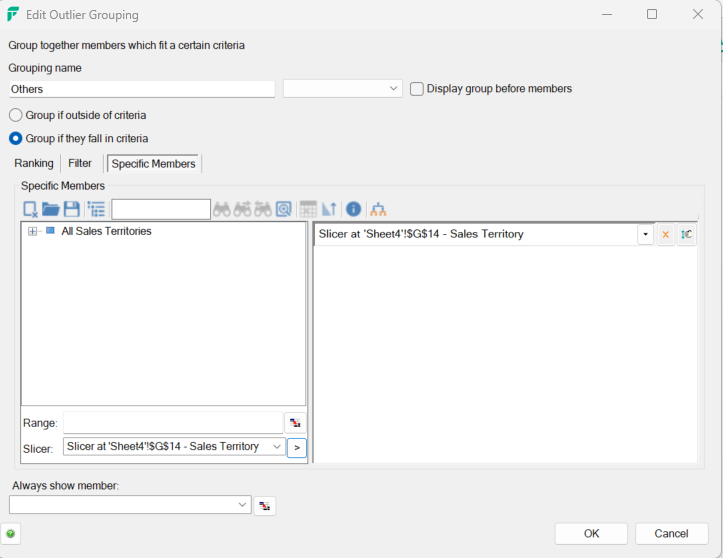
- Open the member selector for Sales Territory and add the Outlier Grouping.
- Type a name for the Grouping Name, such as Others.
- Select the Group if they fall in the criteria checkbox.
- Select the Specific members tab.
- Select the > next to the existing slicer to add it to the selection window, and choose OK.
You will get a slicer that allows the user to dynamically group the results.
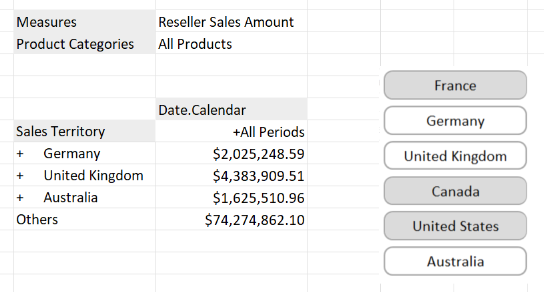
Additionally, you can reverse which members are grouped/separated to get the opposite effect.

