Dimension slicers simplify the process of creating cube dynamic drop downs.
These display options are available:
- Tree view
- Combo box
- List box
- Buttons
- Member selector
- Time slider
- Workbook slicers
The member selector slicer type allows efficient access to more advanced functionality. For example, searching. The time slider type gives simple access to date and time hierarchies. For more complex date requirements, see the date slicer type.
The workbook slicer type enables you to have slicers in a task pane outside the worksheet area for easy access.
Grid slicers
To add a slicer to a grid, right-click the relevant dimension member, and select Anaplan XL > Add Slicer.
You can position grid slicers where required. They aren't limited to the grid area.
The default is an in-cell tree view with the last active member selected.
To configure the slicer:
- Right-click the slicer and select Edit.
- Choose the required slicer display type.
- In the member selector on the right, select the set of members to enable selection from. These can be either static lists of members, or dynamic selections such as children, descendants at level, Level x or ranked lists.
Slicer content can also be driven from an Excel cell.
You can use a slicer in an individual grid as the selection mechanism for multiple grids through the Grid Links box. It can also update a specified range with the unique name of the member chosen, which could for example be used as the argument for XL3Lookup formula.
Standalone slicers
You can add a standalone slicer using the slicer button on the ribbon. Select the hierarchy from the list of available hierarchies, and drag it into the Slicer Hierarchy control.
Standalone slicers must be manually linked into grids. Select the slicer in the member selector form.
You can use slicers to drive other Anaplan XL or Excel formulas and then other reports or query tables.
Excel only slicers
Review Excel range slicers.
Members with no data or non-empty
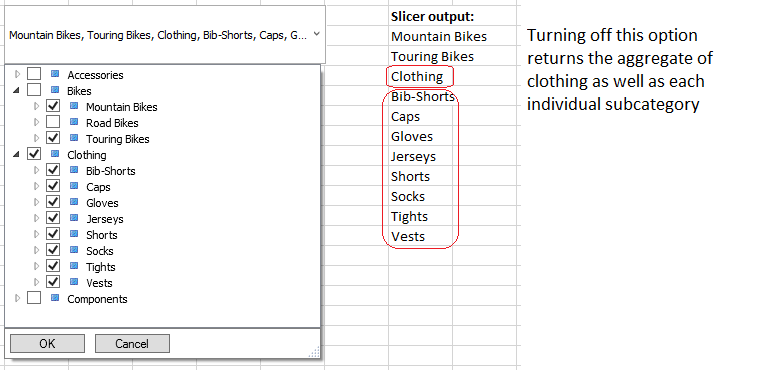
By default, Anaplan XL won't display members which have no data. You can change this behavior so that all members are returned by turning on filtering in the Filters tab of the slicer Edit menu.
Cascading and advanced slicers
Slicers have a filter area in their definition, which can be used to restrict the members returned based on the presence of data.
The example below shows the design for a slicer for Product Categories which is filtered on Geography based on what's been selected in the slicer named Location.
In this example, the selections made by the user in the Geography slicer will cascade into the available selections within this Product Categories slicer, and create an intelligent linked and data-dynamic set of available report selections for the user.
Cascading slicers can also be configured within one hierarchy, where a user choice made at a higher level restricts the secondary slicer selections to children of or descendants at level x. This is shown in the example below for the Geography hierarchy.
In this case, the cascade is achieved by selecting the initial (Country level) slicer within the Geography hierarchy, and then choosing Descendants at State.
Slicer selections can also be defined as a dynamic filter or ranking in the same way we might rank or filter hierarchy members in a grid. To achieve this, the slicer content is defined as an advanced selection, and the ranking, filter, or sort is defined here.
In this case the Product Categories filter content is restricted by Geography in the filter area, which is in turn based on another slicer selection. The members to display are then defined in the advanced dialog as the lowest level members where sales are over 400 units and sorted descending.
Behavior
Initial Value
When you create an Anaplan XL slicer, under the Behaviour tab, you can include an initial value, which can be:
- Current Selection: Sets the value of the slicer as when the report was published.
- First Selection: Sets the value of the slicer to be the first in the list of possible selections.
- Last Selection: Sets the value of the slicer to be the last in the list of possible selections.
- Default Member: Sets the value of the slicer to be the default member — usually the All member.
- Range: Sets the value of the slicer to be whatever the cell value is in the range location defined.
There are various options for when to apply the initial selection:
- Selection becomes invalid: The default for new slicers, when the current member selection becomes invalid then the initial selection is applied.
- Report Opens: The initial selection is only applied when the report first opens.
- Available items change: The initial selection will be applied if the available members changes (even if the current selection is in the new list of slicers).
Updating Excel Ranges
You can set up a slicer to output the selected item(s) to an Excel range which can then be used to drive formula reports.
If you have multi-select turned on, then you should select a range of cells instead of a single cell. One selected item from the slicer will be put into each output cell in the range.
You can use the XL3Member formula to reference the output range, and run XL3Lookup formulas from this.
Setting two or more slicers to output to the same range will keep the slicers "in-sync" with each other, so updating one of the slicers will also update the others.
MultiSelect and Parent Child Checkboxes
The multi-select members options enable you to select one or more members from the slicer.
Turning on the Parent/child checkboxes are related option means that selecting a parent member includes all of its children. This makes it easier to select an entire level and then exclude members where desired. This option is off by default to enable users to select children members in addition to higher levels.
Wait for Submit on Web
The option to Wait for Submit on Web allows several slicers to be changed and, rather than the report refreshing for each change, waits for you to select the Submit toolbar button or use a Submit XL3Link or Picture Links.
This removes the individual Submit button from multi-select slicers.
Use query restrictions for children
For tree slicers, the default is to show all children when expanding a member. By checking this option, you can restrict the children using the same query used for the initial member list. This is most useful when restricting the tree to show only members with data, as the non-empty will be applied to the children as the tree is expanded.
This option is also available for Member Selector slicers.
Activate XL3Link
Select a cell containing an XL3Link to activate the link after a slicer selection has been made.
Page navigation example
Create an Excel slicer with the names of the workbook sheets. Output the selected member to a cell.
Write a simple formula to get the address of the sheet to link to for example =B6 & "!A1".
Create an XL3Link which references the address formula as its link location.
Edit the slicer so that it activates the link.
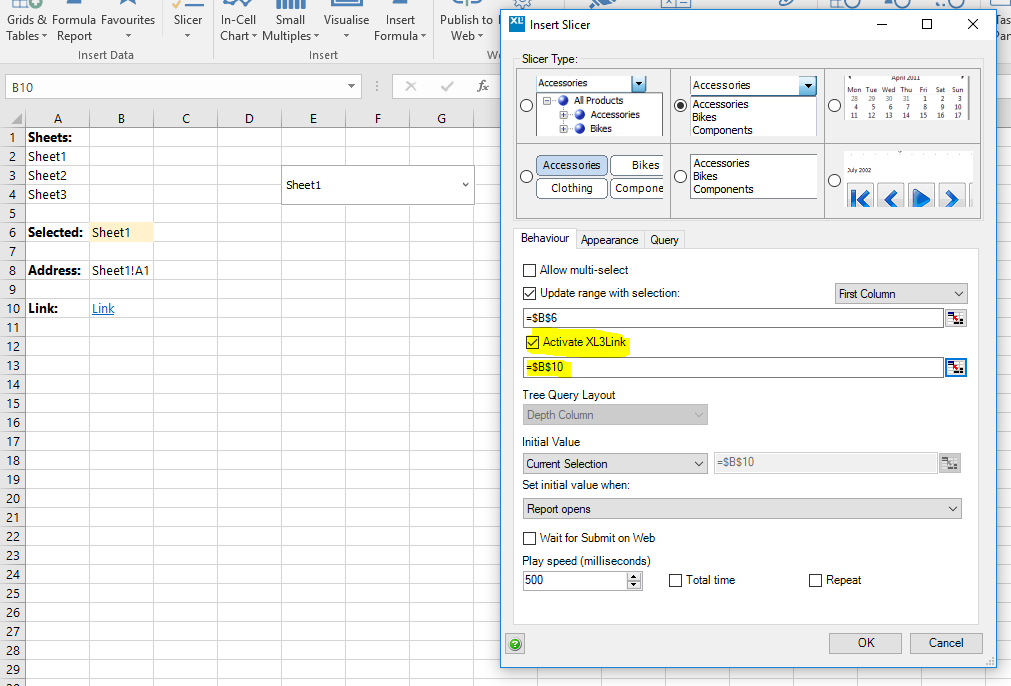
Note: By default, the XL3link adds XL3Address(Sheet1!$B$8) from the XL3Link menu.
With XL3Address the link refers to the location in the bracket. If you remove XL3Address the link refers to the content of cell B8.
Appearance
Disabling slicers
If you show the title bar, you can optionally add a disable button to the slicer.
Selecting this option toggles whether or not the slicer filters objects it's linked to. This means you can easily turn off a slicer to return all results. If the slicer outputs to a range, then that range will be cleared.
Slicer title from Excel range
You can give a slicer a name and this is its default title if the Show title bar option is enabled.
However, you can choose to use the content of an E
xcel cell as the slicer title (the slicer name as it appears in Workbook Objects remains the same).
Custom query
You can set up a custom query on slicers, whether they are based on a cube or SQL database. The query can be driven from a range so that changes in the report update the available items.
Alignment options
When Move/Size mode is enabled for Slicers, Small Multiples, TreeMaps and Maps, there's checkbox in the top-right corner of the control. If this box is selected for multiple items, when any one of them is moved, you're prompted as to whether you would like to align all the other selected items with it. When an item is resized, all other selected items will be resized to the same size.
Note: You can use the XL3SetProperty formula to update slicer properties.

